HomeContact Us        
Picture Restoration Sampler
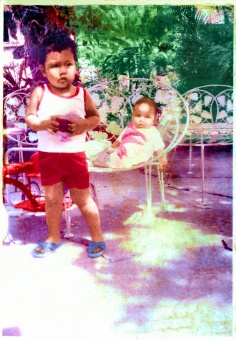
           

                 OLD PICTURE              

        RESTORED to 80%      


PHOTO RESTORATION

Basically all photo restoration procedure that is to be done digitally requires the use of a PHOTO EDITING SOFTWARE. Most present photo editing software packages offer quite similar features. Whatever the tool or software is, it is still the user that determines how such restoration is to be done. Here are some factors:

  •  Mastery of the Tool (Software)

  •  Eye of the restorer

  •  A Capable Computer (Most Present Computer are fairly capable)

  •  Must have "perfectionist's" attitude

  •  Mouse Mastery (Pulse must be 90% accurate)

  •  Must not be color Blind ;-)

Now, photo editing requires an ample amount of time, so be prepared. Don't do too much work to strain yourself especially your eyes. Take as much time to carefully edit each portion as needed. Preserve different copies of current work by saving it on different filenames. The most helpful names would be Pic1, Pic2, Pic3....etc. The purpose of which is to have a progress reminder as to how much restoration you have done, as well as having a back-up copy if any present editing goes wrong. Two of the most popular photo editing programs are:

  1. Adobe's PHOTOSHOP

  2. Jasc's PAINTSHOP PRO

Most Professionals say that PHOTOSHOP is the premiere photo editing suite, remember that for price comparisons, PAINTSHOP PRO is cheaper and both of them has quite unique tools. Basic Editing tools on both programs are quite similar. I suggest using what suits your budget.

What I used here as an example photo is of my two elder brothers when they were as cute as they are now. I think this photo was taken about 30 years back. It was molded in wood and resin. That was the oldest form of picture lamination I know (Egyptians or whatever may have the oldest). It took me about 2 weeks to restore the photo, I stopped at 80% for some details cannot be restored without losing some image information. I may have done it in fewer days but I have a life too. So here are the STEPS:

  1. Find a photo that needs to be restored...

  2. Assuming you have a scanner, Scan the photo to a resolution that you deem you can handle editing, remember higher resolutions results to bigger digital copy which is good in editing photos but is taxing to slow computers. A 640x480 copy is good.

  3. Make Copies, save some on other folders.

  4. Analyze where to start. Leave Foreground images last.

  5. Now Imagine to what extent of restoration you can muster, and a have a time frame.

  6. Good File Extensions or File Format to use when editing is the default being used by your photo editing software, because they preserve layers and other info when a picture is unfinished.

  7. File Format of the Scanned Pic may be of JPG/JPEG (Joint Photographers Experts Group) format or Windows own BMP (Bitmap). I suggest that when saving the finished picture (pic as often used hereon) when saving Hard Disk Space is to use PNG (Portable Network Graphics) format, almost the same quality as bitmap but less in file size. For Posting in Internet, or for copies that you can use in whatever you deem to use the picture but requires you lesser file size, use JPG. JPG Compresses your picture but bear in mind that unless you have a perfect eye, Printing from JPG picture copies at about 5% compression results in not so noticeable grains or pixilation. It still depends on your printing machine and printing media.

  8. Get Ready to Edit and Restore.

TO LEARN MORE PLEASE GIVE FEEDBACK AT THE REACTIONS PAGE OR BY E-MAILING ME AT demonhale@yahoo.com

If you find this site useful and would like to donate to support the continuing improvement of this site, please click the link below